The Promise of Spring

The season starts with a dream and faith in the smallest seed.

Harbingers

Even after the harshness of winter, life prevails and surprises.

A pop of color.

Longer days and sunny skies bring a pop of color to brighten the early spring.

Wild times.

Even in the heart of the city, wild things abound.

Ephemeral beauty.

Some are visitors just passing through.

Wednesday, July 4, 2012

Mums The Word...

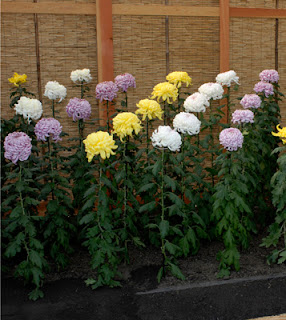
One of my long dormant gardening interests has always been a passion for mums. It started I suppose with the traditional garden mums that pop up at home centers every fall, but it definitely grew from there once I was introduced to all of the truly amazing cultivars and Japanese shaping techniques known collectively as Kiku. I first ran across them when researching a visit to the NY Botanical Gardens a few years ago. Here are just a few of the amazing shapes:

Kengai: Mum Cascades - NYBG
 
Ozukuri: 1,000 Blooms - NYBG
Ogikui: Single Stem - NYBG
Of course you can't just go out to the garden center and pick these up, so it means planning ahead and special ordering plants via mail order to get started. I went with King's Mums out of Oregon which is one of the largest providers in the country of the special varieties used for the Kiku methods. If you check out their site you'll quickly see that there are a ton of different types and varieties of mums. I decided to start with a sampler pack to get started and have a chance to try out a variety of different types of mums. That way I get a chance to experiment a bit and see what works, what I like, and exactly what it takes to grow the different styles. 

CLICK BELOW TO READ MORE!

Bringing in the Harvest

The first flush of the summer harvest has begun! This past weekend we celebrated our very first full scale harvest of something besides the salad greens which we've been enjoying for a couple of months now. (And would still be enjoying if not for the groundhog...)

Here's a quick peek at our first haul:

Broccoli and Cauliflower
 It got SUPER hot here the past couple of weeks which caused the broccoli and cauliflower to start to head towards bolting pretty quickly. This is actually the "seconds" of the broccoli. We had harvested the main heads last week because of the heat.

Yellow Summer Squash
 The green squash got off to a slow start after it had to be replanted, but the yellow squash has been cruising right along. The one on the right is about the ideal size, the one on the left was let go a BIT too long. The problem with squash is that it seems to go from tiny to HUGE overnight!

Bush Beans
This is the first flush of the 2012 bean crop. I was actually surprised that these guys were ready to go before July 4th, but they were nice and plump. I've just finished the second planting of bush beans after the salad greens finished, but I had a few plants in just to bridge the gap before the climbing beans kick in. Speaking of climbing, the climbing beans and the winter squash are both going like crazy:


The tomatoes are really coming along now as well:


On the left, some Razzleberry Hybrids, and on the right some Zeebra heirlooms. (You can already see their stripes developing. After as slow start, the Romas are starting to ripen... just in time for the 4th!:


Wednesday, June 6, 2012

Bee-Checkup - Week 3

It's been three weeks since the ladies arrived. (Dave asked me to explain why I call them ladies...) Most of the bees in a hive are female, with only the drones being male. Only about 200 - 1000 of the up to 60,000 bees in a typical hive are drones. Because drones don't really do anything for the production of the hive, they are kicked out in the fall by the worker bees, so in the winter the entire hive is exclusively female. Additionally, drones don't have the ability to sting, because the bee's stinger is part of the female egg-laying mechanism.

The bees have moved up into the second super, and there are eggs and larvae present. They are only on a couple of the frames at this point so we decided not to add the third super.

6/2 Hive Inspection
In the frame above you can see that we've moved into the next phase of development in the hive. There are two things now clearly visible that we didn't have during the last inspection. The white area at the top of the frame is capped honey. That's honey that has been ripened by the bees by altering the moisture content and then sealed away in wax for later use. In the middle and bottom of the frame you see cells that are capped with a yellow colored wax. That's capped brood. Inside those capped cells the bee larvae are spinning cocoons and entering the pupa stage before they emerge as young bees.

The empty cell group in the center is an area where bees have already emerged. The bees will clean out those "used" cells and the queen will lay in those areas again and repeat the process.

Here's a closer view one of the frames. You'll notice that that the bees are much more interested in what they're working on to really be bothered with trying to attack. This is a nice solid pattern of brood, so it looks like our queen is probably doing just fine. We looked for her this week, but she didn't want to come out and show herself.

In the two pictures above, the bees have pulled out comb on the entire face of the frame. On some of the frames they still have work to do. This is one of the frames from the second super that a group of worker bees is working on building comb. The black plastic foundation is embossed with the comb pattern and comes pre-dipped in a very light coat of bees wax and the bees pretty much take it from there.


The most frequently asked question so far from people is how soon will you get honey??? We won't really know that until we see how long it takes the girls to get everything set up. We may get a little, we may not get any this year. Once they have comb built they then need to store about 150 lbs of honey for their own use to sustain them through the winter. Once THAT is complete then any excess we can take as our harvest. Next year since they'll already have all of the combs pulled out, they'll spend much more of their energy on increasing the size of the colony and making honey. Time will tell!


Memorial Day 2012

I was on vacation last week so I took some time to tackle a few large projects that had been looming for some time. Not everything is camera ready just yet, but a here is one of my finished projects...

BEFORE:
2011
AFTER: 
2012
When we cut down the old chestnut tree that used to be in the center of the drive there was a big uneven spot that was difficult to grow anything in because the tree guys couldn't really grind out all of the stump due to the driveway being in the way. Last year I planted up some lavender in pots and placed those on concrete pavers. During the summer I had my solar fountain up in the center on a column built out of pavers and regular concrete block. Over the winter I pack up the fountain and put out a potted spruce tree. By this spring the lavender had overgrown the pots and was to the point where it needed to be watered every single day. I also decided that I wanted something a bit more substantial and I was tired of dealing with the grass/weed mess. 

I decided to use the last of my reclaimed wall block to build a circular planter around the block plinth so that I could create a raised bed. That would eliminate the issue with not being able to dig into the ground because of the tree roots, and also be visually a bit more appealing since this is one of the first areas that you see pulling into the driveway. I leveled out the area, filled with garden soil, and planted the lavender. It isn't quite full enough to fill in the circle just yet, so I also planted some beautiful blue delphiniums in between. Unfortunately the fountain pump was busted when I went to put the fountain out, so for now the spruce is staying out there. Overall, I'm pretty happy with how it turned out.


Wednesday, May 23, 2012

First Hive Inspection

Saturday marked 10 days from the arrival of the bees, so it was time to check in and see how they were settling into their new abode. (Special Thanks to Jason who agreed to serve as my photographer so that I didn't have to juggle bees and the camera to document this momentous occasion!)

Feeling like the Michelin Man
SUITING UP
While it is perfectly safe to work around the hive without any protective gear, when it comes to actually opening up the hive body and working on the frames, safety is important, so that means suiting up with the full suit and veil. Honey bees are very gentle, but it is important to remember that you probably wouldn't like it very much either if someone essentially ripped the roof off of your house while you were taking care of your babies either! 

8 frame Super with Plastic Frame


SUPER! 
Once suited up, it is time to gather up all of the necessary equipment. Obviously you want to make sure that you have everything ready to go. Since we're hoping that the bees have pretty much managed to get the hive up and running there is a possibility that they'll already be ready to expand into a new super. I'm using 8 frame medium supers which means that the box itself holds 8 frames or foundations on which the bees will build their comb. Traditional beekeeping used 10 frame deep supers, but those can be pretty heavy to move once they are completely filled, so many home bee keepers are now using the smaller and more manageable 8's. The only downside is that you need more supers. A normal hive will usually need about two 10 frame supers or three 8 frame supers. Today's task is to see how far they've come at building out comb on the frames. If they're working all of the frames, then it is time to give them more space to keep them happy! In my hive I'm using plastic frames in the hive body section of the hive. These are single piece units and you can probably see that they are stamped in what looks to be a honeycomb pattern. The frames are then coated in beeswax so that the bees will more readily accept them. The stamped pattern helps the bees by basically laying out the "road map" for how they should set up the comb. They will build perfectly aligned combs even if there was nothing stamped, but this speeds up the process for the. Think of it as laying the foundation for their buildings. 

Where there's smoke:

Lighting the Smoker Fuel
The other critical piece of equipment is going to be the smoker. Applying small and gentle amounts of smoke to the bees helps to disrupt their alarm / defense responses and keeps them calm during the hive inspection. In this case I'm using "smoker fuel" which is essentially compressed lint from industrial fabric manufacturing. It doesn't really hold an open flame but instead smolders in the smoker can and produces a gentle cool smoke. I've also filled up the large entrance feeder which is the yellow and black thing in the bottom left of the photo. It's full of a 1:1 mix of sugar and water and is what sustains the bees while they are setting up shop. We'll be swapping out the smaller one that we used for the last week. The bees go through a TON of the feed, so having a larger feeder will mean we aren't filling it up multiple times each day!

MORE AFTER THE JUMP!

Reach for the Sky

Time for a quick veggie garden update. I managed to finally get the rest of the greens planted on Sunday... a week or two behind schedule but they should be fine. At the top of the picture you can see the early romaine lettuce is just about ready for harvesting. Jason will be happy! In the open spaces we'll soon have spinach, swiss chard, radicchio, and more lettuce. tucked into the straw at the top of the bed is the summer and winter squash and cucumbers as well as the okra and sun flowers. To the left all of the cole crops are still very happy and growing away!  The drip irrigation is on during this photo so you can see how well the set up is working.

The Greens Bed... circa 5/20 

Many of the early plantings are well on their way and so I spent most of the morning fashioning their supports for the season:

Tomatoes with stakes and arms in place.
I'm re-using my "Ultomato" stake system from the past few years... I do have to say that it has held up pretty well. The only complaint that I have is that I wanted to swap out the 5' stakes that it comes with with 6' stakes since half of the tomatoes I planted are indeterminate and when I went to do that I discovered that all of the new stakes available are a smaller diameter and the old arms were too big to grab them snugly. After several futile searches at various retailers I just solved the problem by wrapping each of the stakes with duck tape in the area that the arm needed to connect. Not the most ellegant solution, but working for now anyway. Hopefully by next year we'll have relocated the garden to the back, and at that point I'll devise a bit more permanent and re-useable trellis or support system . We'll see!


This is a shot of the egg plant and pepper bed... neither of which need staking just yet, but for some reason I do finally seem to have a few peas trying to make it up. They should have already been up and harvested by now, but they just weren't cooperating earlier in the season. I decided to just let the ones that came up keep going so I made some little tee-pees with some shorter stakes. Well have to see how that turns out. We may or may not ever actually get any peas... that still remains to be seen! Here's hoping!

And then my pièce de résistance (hopefully anyway!)... My bamboo bean trellis:
Bamboo Bean Trellis

In the past I've done single poles and used a round wire ring at the bottom and then strung twine from top to bottom. Since this bean patch is slightly larger and I'm doing three different types of climbing beans I decided to try something different. Instead of supporting 1 sq ft of climbers, each tee pee here will support 4 sq ft of beans. Then I connected the four at the bottoms on either side, the middle on either side, and the top. That gave me support for the twine to be strung up and down which ensures that the beans have plenty of surface area to work their way to the top. In the old set-up by the time the beans got to the top of the pole there the amount of surface area was so constricted that everything turned into a big jumbled mess. Even though there is still less room as they get to the top of this trellis, it still should give them a much better opportunity to space themselves out. I checked on progress today and the beans are all up and well on their way towards reaching up to the bottom rungs to start their ascents!


Wednesday, May 16, 2012

Settling In

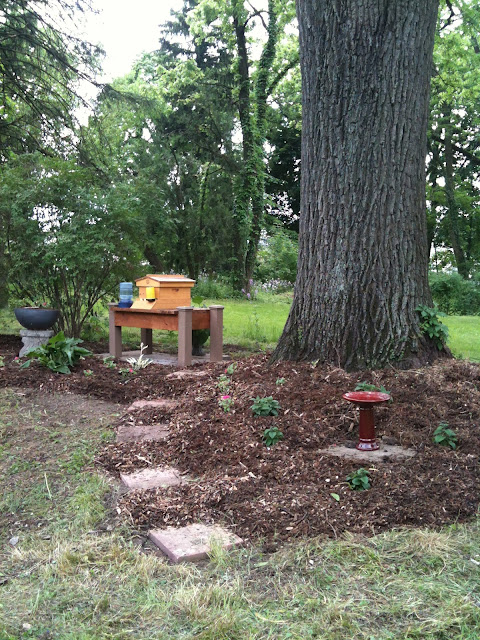
Spent part of the weekend working on getting the finishing touches put together on the new home for the Bees. After getting them all situated last Wednesday, I decided that the area where they are going to reside needed a bit of sprucing up to make them feel right at home. To recap... this is the before:


Not bad.... but not exactly what the girls were dreaming of.... So a little elbow grease, some plants, and a bit of mulch and we ended up with this:


I worked created a stepping stone path that curves up the hill and around to the back of the hive which is where all of the work gets done from. That defined the edge of a new bed around the base of the tree. I used a reclaimed chunk of concrete as a base for my bird bath and planted the area with some bee balm (naturally), heliotrope, and impatients. In  the bed in front of the hive I planted three hostas, one of which we salvaged last weekend from Jason's house that we are selling. Then I used the old bench base that we found in the yard last year as a pot stand and planted some more impatients. The bees can drink about a liter of water a day, so Jason had the idea of using our old "cat water-er" for them. (The blue thing) I put a piece of broken brick in to keep them from falling in and drowning..... They don't really seem that interested in it, but we'll see. Maybe once it is warmer out and they aren't getting the sugar water they'll be more inclined to check it out.

I worked out there for most of the day on Sunday and the bees didn't really seem to mind which was good. Of course I did my best to stay out of the landing pattern! I did get stung tonight for the first time. It was entirely my fault because I decided to try and feed them again and it was way too late to disturb them. One of the girls got me right on the cheek below my eye. Luckily, other than a bit of redness there wasn't any other reaction so apparently I'm not allergic. Lesson learned!

Here's a short video of the girls at work on Saturday.... if you watch closely you'll see a couple of them coming in with their "hip flasks" full of bright yellow pollen.


I'm looking forward to checking in on them on Saturday which will be my first official "hive inspection" to make sure that the queen is out and laying and that they are pulling out combs. For that I'll need to put on my full suit and fire up the smoker. Should be an adventure!

Wednesday, May 9, 2012

Happy Bee-Day

Today we're celebrating the arrival of our very first honey bee colony! Bees are something that I've been interested in for many many years. Up until the move we didn't ever really have room to safely keep a hive around. This year I decided to go ahead and make the investment and get started. It takes a LOT of stuff to get set up, but like any hobby/project once you have the basic equipment it is fairly straightforward. You have to order everything in advance and place the bee orders in the winter, so I've literally been waiting for MONTHS for today.

So right off the bat I'll say that I was setting everything up by myself, in a light rain (bees hate rain), and trying to get done while there was still some daylight left, so the pictures are SKETCHY at best and taken with my phone.

Bee-hive stand
The fist big decision was to figure out where to put the bees. They have a home on the "master plan" but the problem is that the area where they need to live eventually is right in the traffic lane for a couple of other as-of-yet-incomplete projects including replacing the shed. Since bees don't really appreciate a lot of noise and attention I figured it would probably be best if I put them somewhere else for the time being. The absolutely ideal place is down by the windmill, but as that's the lowest point in the yard and was under 3 feet of water during last September's flood I decided that probably wasn't the smartest place either. I settled for a relatively flat spot next to the big walnut tree in the middle of the yard.

Since I was tied up all of last weekend getting Jason's house re-landscaped I was running behind on getting the area prepped and ready so really had to hustle this evening go get it all together. I leveled out the area and laid down six large pavers for my hive stand to sit on. This will keep me from having to mow too close to the hive. I'm pretty sure there was a landscaped bed here at some point, and I'm planing on landscaping around the area with some plants that can tolerate shade and the walnut tree poison and reduce the need to disturb the bees even more.

The hive stand is a bit beefier than it probably needs to be, but a full hive can weigh over 100 pounds, and ideally we'll end up with 2 hives if everything goes well this year, so I wanted to be sure it was sturdy enough. The wood was all left-over from the garden bed project and I didn't even have to cut it. I stained it to match the beds which are more or less adjacent so that everything looks like it belongs.

Special Delivery
The best Priority Mail package ever! The Post Office called just before lunch to let me know that they had some bees for me... I could tell by the guy's voice that he wasn't exactly thrilled about it, so I told him I'd be right up to pick them up. It was pretty funny to see everyone's faces in the lobby when they brought up this buzzing box full of bees. I thought the one customer was going to run out screaming. They had it in a big plastic letter box and the guy carried it out holding it as far away from himself as possible. Everyone just stared when I just reached in and grabbed it and told them thanks and walked out. Mostly they were freaked out because there were a couple of bees on the outside of the box since the swarm attracts other bees if they are in the area. They'll just hang on and wait to see what happens so there's really no need to worry about it. I just sat them on the floor of the car and headed home. I gave them a little fresh sugar water to hold them over until dusk which is when you want to be getting them settled into their new digs.


Successfully Installed 

Here's the hive set up with most of the bees already moved in and getting to work setting up their new home. This is an "English Garden" hive from Brushy Mountain Bee Supply and it has a nice copper top on it that will tie in nicely with the copper on the herb beds and should weather nicely over time. It looks a little small right now because to get started you only use one super (box) until they get established. This is an 8 frame shallow super set up which is a bit more manageable than the traditional deep 10-frame hives that you may have seen in local orchards or farm fields. One of the suggestions that was given in the book that I'm reading was that for people raising bees in the city not to paint the hives the traditional bright white color, so I went with a light cedar colored stain that nicely sets off from the darker stain of the stand and the copper. The yellow thing is an entrance feeder which is full of sugar syrup. the bees have to be fed for about 6 weeks until they've fully established themselves and have had time to build up some honey stores to support the colony. You can kind of see a few bees left in the shipping crate just below the hive. It's impossible to get EVERY bee out of the box so you just leave it sit there and in a matter of time they'll make their own way out and up into the hive.
Checking Things Out

Here's a close-up of the front of the hive. The lighter colored piece of wood is the entrance reducer. This blocks off most of the front of the hive with the exception of the little square that you can see at left. This makes it easier for the bees to defend the hive while they are getting set up and building up their numbers. The bees gathering at the right are ones that were flying around or outside when I closed up the hive. they can tell that everyone else is inside and are figuring out how to get in. Eventually they found the hole and in they went. By nightfall it looked like pretty much everyone was safely inside. We should finally get some sun tomorrow which should make them happy and give them a chance to work on getting the queen eaten out of her cage so she can get to work. After that it will be a few more weeks of getting established before it will be time to try for our first honey!

I'm happy to report that I managed to get everything set and the bees installed without any major incidents or any stings, which I thought was a very big win! I had one slightly tense moment when a bee somehow got inside my veil and was flying around inside right by my face... but I remained calm and carefully let it out and everything else went off without any issues. Everyone who keeps bees gets stung eventually, so I'm prepared for that, I'm just thankful I didn't have to START my adventure with a sting!

Unfortunately I couldn't take photos of the actual process of installing the bees because it pretty much takes all of your attention to manage 500+ bees at one time and get them to do what you need them to do in a relatively short period of time. If you're super interested you can get an idea of what happens by watching the video here: Bee Installation Video from the company that my bees came from. My hive set up is slightly different and so the technique is slightly different, but the general steps/process is the same.

More to come....


Thursday, May 3, 2012

Veggie Progress

I took advantage of the projected warmer weather this week to go ahead and plant out some of the veggie seedlings that have been waiting in the wings for the past couple of months... This week looked pretty safe... with May 5th the projected last frost date, and temperatures projected in the mid 70's to low 80's I figured I'd risk it this past Sunday and go ahead and get them in the ground. Of course no sooner had I finished with the peppers and eggplants then my weather alert went off on my phone predicting frost..... 

Tomatoes!!!!
Yup... those are my tomatoes that started off as little seeds in the basement a couple of months ago! They got so big so fast I had to eventually up-pot some of them into 1 gallon containers! A few of these guys even have blossoms already! I'm hoping for a smooth transition and an early harvest!!!


Eggplants and Peppers
 The egg plants are also well established at this point! The peppers are not quite visible at the far end of this bed... A bit of a debacle with the peppers... For some reason I didn't label each individual pot when I re-potted them from the seed starting trays. I guess I thought I'd remember which was which... Yeah, not so much! Oh well... so much for my strict planning and organization in this bed.... it will just be a "mixture" of peppers!

Tomatoes planted and mulched
Once everything was planted I mulched them in with straw. The open spaces are the turnips which are coming along nicely now. I kept the pots out for the night and used them to cover the tomatoes to protect them from the frost... Everything made it through the night without any issues! The only thing I realize now that I forgot was that I wanted to put some broken up egg shells in with each one for some calcium... but oh well! I'll have to just be sure to work some in.


Tuesday, May 1, 2012

Weekend Projects

A couple of my recent projects inspired by a few things I ran across on Pinterest:

Re-purposed Glass Birdbath.

Recycled / re-purposed glass birdbath. The bottom is an old vase and the top is an old cut glass crystal ceiling light shade. You can't really see it in the photos, but the shade has an embossed floral pattern around the sides. Picked up the pieces at the Salvation army for about $5 and a tube of clear epoxy from Lowe's. Total time... about 5 minutes. It looks great in the little bed off the back patio.


The leaning tower of berries....
Recycled / re-purposed pipe and wash tub. I got the idea for this from a photo online where they made hanging planters out of pipe for strawberries like those upside down tomato planter things... I just happened to have a piece of pipe laying around from the unfortunate sewer leak from a couple of weeks ago. I don't have any where to hang a pipe full of berries... so I improvised. I used a toilet flange on the bottom of the pipe and attached the pipe to a couple of extra pieces of lumber from the garden beds. Buried that in the bottom of the old wash tub (it already had a drainage hole) with a layer of gravel and stone and then added potting soil. It does lean a BIT to one side because the bottom of the tub was buckled, but it isn't that bad. Jason thinks the birds or squirrels will enjoy them more than we will, but I'm hoping! If I have to I'll coat the pole in Vaseline!


Saturday, April 28, 2012

Dive Right In

One of my projects for the past several weeks has been the installation of the garden beds out front, which you can see in one of my earlier posts. In addition to those beds I also constructed to 9' x 14' triangle beds which will anchor the (eventual) back patio. Now that the one walnut tree has been removed, this area gets sun for most of the day, making it an ideal location for housing the herb garden. The site is adjacent to the kitchen door and will be easily accessible when we have the outdoor dining area complete one day.

New herb garden bed. 

Today I finished off the first of the two beds.... It turned into QUITE the ordeal. When I designed the beds I made them twice as tall as the front beds so that there was a more definite visual separation from the lawn since these two triangle beds outline the south side of the future patio and form the book ends for the paths coming down from the future rose garden. Needless to say once they were built I couldn't move them by myself. I also underestimated how much dirt it would take to fill them in. Originally I thought that the bed closest to the house would end up needing to be cut into the slope of the yard pretty significantly, and the plan was that the dirt would then be used to back-fill the majority of the bed. As it turned out, that didn't happen, and I had to actually raise up the far end of the bed just to keep it level and in line with the back slab.


Filling the bed
Well in the process of replacing what little dirt I had actually removed to level the bed I looked up and caught a glimpse of the weeds growing up inside the pool. not looking forward to another summer of spraying and chopping weeds in there I was thinking to myself how I needed to just get in there and clean out the entire mess since I'd have to dig it out one day anyway when I get around to installing my pond. That's when it hit me... I needed DIRT to fill in the herb beds and the pool just happens to be FULL of dirt! Can you say 2 birds... one stone? My only concern was that since the pool is covered in trash and debris I had never really investigated to see what the quality of the fill was. My luck it was filled in with concrete chunks or bricks or something else that would be utterly unsuitable. A few preliminary shovels and things looked promising. 

Getting started. One bucket at a time....


The soil isn't the best, but at least it isn't completely full of rocks. The first few inches are actually pretty decent top soil at this point from all of the years of leaves and weeds rotting in there. The only annoying thing is that I had to carry out the dirt by hand using 5 gallon buckets since I can't get the wheel barrow down in the pool. I managed to get 6 buckets worth of dirt into each wheel barrow load. After literally 50 or more trips back and forth the bed was filled and ready for a top dressing of peat moss and compost. 

After the bed was filled.


I made a dent in the pool, but there's probably PLENTY of dirt left for the second bed and then to level out the rose garden.... 


I tucked in my little herbs, added a bird bath, and installed the post caps. I'll mulch with straw tomorrow to help keep the moisture in the beds, but things are more or less done for this one. My very first truly dedicated herb garden! I couldn't be happier.

One down... one to go.

PS: Did you know you can now sign up to follow my blog via e-mail? Just enter your e-mail in the box at the right and you'll get an e-mail automatically every time I post an update.

Thursday, April 26, 2012

Ornery Critters

After banishing almost all of the groundhogs last year it seems we've moved on to a few other local critters:

Opossum
I actually caught this guy twice in my effort to catch the remaining groundhog. This is a photo from the first time when I actually let him go. (Or tried... he wouldn't leave the cage so I had to prop it open using the rock so I could go to work. I caught him again this past weekend and decided that meant he'd earned a permanent relocation.

Salamander
Found this guy in the big mulch pile when working on the front beds this past weekend. He was very squirmy. I moved him a bit closer to the creek which I thought would be much safer than leaving him in the pile and risk impaling him with my pitchfork during mulching!

Tuesday, April 24, 2012

Veggie Update!

Quick end of April update:

Cabbages, broccoli, cauliflower, and brussel sprouts all tucked in to their bed in the center of the new raised bed garden. They look pretty happy. (The stakes are to hold up the sheets in the event of a late-breaking frost.)

Cole Crop Bed
 In the new wooden grow house, which I'm loving by the way, the tomatoes are getting impatient and looking forward to their permanent home. In fact, this week's projected cold weather meant that I had to do some quick shuffling of shelves inside to make room for them since they are now too big to close the lid! I also had to  up-pot almost all of them from their 4" starter pots to some left over quart size pots since it looks like it will still be a couple of weeks before they can be planted out.


Sunday, April 22, 2012

Vacation Progress

Having spent most of my Spring vacation tucked away in a basement... (don't ask :-) I did manage to get in two glorious days of digging and planting. Mostly I worked on the foundation plantings since we started with a mess that took most of last year to tame. I needed to get in some shrubs that will eventually fill in and give some structure to the beds.

As a reminder... this is what things looked like a year ago when we bought the house:


 Then we got to this early last year after the trees were removed:
.

And after a bit more progress in July of 2011:

And now a few shots from this week's progress:

 LEFT: View from the front walk showing the new veggie garden beds. Went with a rose standard in the center pot for now. The blue pots will be ornamental peppers and nasturtiums once the weather warms a tad!  Hard to see in this photo but I added some bright red azaleas in the main bed right under the planter boxes. They should really pop in ta few years. RIGHT: The front entrance. Sadly only one of the evergreen standards survived the winter/remodel... I replaced them with two holly bushes which will be a bit more forgiving of the lack of sunlight in the winter. Eventually I'll trim them up in a formal cone shape. They need to settle in first. All of the mums and pansies in the pots are still going from last year! I also planted two pieris bushes right behind the planters which are small now but will eventually fill in on either side of the steps.

East Side Bed

This bed (ABOVE) is where the little veggie garden was last year. The only repeat here is the very happy hosta. Everything else is newly planted including a butterfly bush and three day lily clumps from my buddy Marc. I also planted in a few Bleeding Hearts which I love. 


 This is the new bed that I made last year with the blocks from Dan and Jo on the west side of the front. It was completely empty past year except for the rose and a false indigo bush (not up yet!). On this side I planted two purple rhododendrons, a pieris, three columbines, three day lily clumps (from Marc), and one of my baby lilacs that I propagated from  root divisions last fall. I also used some of the left overs from this year's tree removal project to make some stepping "stones" into the bed so I can tend to the climbing rose. I think they look pretty nice. 

I also planted a few additional plants in the East side shade garden outside of the library:

This bed is filling up delightfully! I added three foam flowers, and three hellebore plants (aka Lenten rose). I have some coral bells still growing in the basement and will get those out there too in the next month or two! 

I also replanted the planters on the pedestals since I use annuals there:


NOT pictured but also accomplished.... I finished the trench to bring the water line and future power line from the veggie beds to the house. Hopefully I'll finish the water connections this week so the watering will be a bit easier (especially now that I can't drag the hose through the empty east side bed... I also planted two tree peonies and 4 mungo pines to spruce up the area right inside the front gate. What you might be able to see is I also took the time to label nearly everything in the foundation beds so that I know what/where they are and of course so that visitors know too! I've used 100+ labels just in the foundation beds!!!